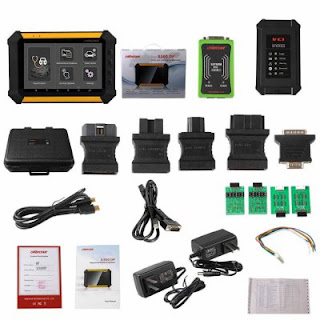
How To Do OBDSTAR X300 DP Full Configuration OBDSTAR X300 DP Mileage Correction Wifi And Bluetooth Connection
OBDSTAR X300 DP Full Configuration is powerful diagnosis and programming tool. OBDSTAR X300 DP Mileage Correction will update more in future. Below OBD2Tuner.com sharing How To Do OBDSTAR X300 DP Full Configuration OBDSTAR X300 DP Mileage Correction Wifi And Bluetooth Connection.
OBDSTAR X300 DP Full Configuration OBDSTAR X300 DP Mileage Correction Update Online
OBDSTAR X300 DP Full Configuration OBDSTAR X300 DP Mileage Correction Update Online
1.OBD2Tuner.com OBDSTAR X300 DP Full Configuration Bluetooth Setting
1.Enter Key Master to set System setting, and choose VCI information.
2.Operate according to following prompt:
Please match: VCI_888888888888(Bluetooth name)
Connected: VCI_888888888888(Bluetooth name)
Not connected: VCI_888888888888(Bluetooth Name).Please connect VIC connector to vehicle, X300 DP will connect automatically.
2. OBD2Tuner.com OBDSTAR X300 DP Mileage Correction WIFI Setting
Enter main menu screen, choose Settings > WLAN
When the WLAN sign appears blue, , it indicates Wi‐Fi has been activated already.
Note: To prolong the battery life, please switch Wi‐Fi off when it keeps unattended.Connect to WLAN
Start WLAN, if X300 DP within range of WLAN, X300 DP can automatically detect and connect to current WLAN, select desired network and input password, then you can surf the internet by WLAN.
3. OBDSTAR X300 DP Full Configuration VCI connector connection from obd2tuner.com:
Locate vehicle’s DLC socket. The DLC (Data Link Connector or Diagnostic Link Connector) is the standardized 16‐cavity connector where diagnostic code readers interface with the vehicle’s on‐board computer. The DLC is usually located 12 inches from the center of the instrument panel (dash), under or around the driver’s side for most vehicles. If Data Link Connector is not located under dashboard, a label should be there telling location. For some Asian and European vehicles, the DLC is located behind the ashtray and the ashtray must be removed to access the connector. If the DLC cannot be found, refer to the vehicle’s service manual for the location.
Plug the VCI diagnostic connector into the vehicle’s DLC socket (It is suggested to use the OBD 2 extension cable to connect VCI connector and DLC socket.). For non‐16PIN DLC socket, please select the corresponding non‐16 pin connector adapter, then plug the non‐16pin end
of the adapter into the DLC socket, and then connect the standard 16pin end VCI connector.
For More details information, welcome to Add my Whatsapp (+86 15889512468) or Skype obd2tuner.com) if you have, Your Private Secretary in Car Repair Area! 16 Hours Online at your Service!
www.OBD2Tuner.com- China OBD2 Tuner Tool Automotive Diagnostic Tools Car Key Programmer OBD2 ECU chip tuning tool Center.
Contacts:
Website: www.obd2tuner.com
Skype: OBD2Tuner.com
Email: info@obd2tuner.com
What;s app: +86 15889512468
OBDSTAR X300 DP Full Configuration OBDSTAR X300 DP Mileage Correction Update Online
OBDSTAR X300 DP Full Configuration OBDSTAR X300 DP Mileage Correction Update Online
1.OBD2Tuner.com OBDSTAR X300 DP Full Configuration Bluetooth Setting
1.Enter Key Master to set System setting, and choose VCI information.
2.Operate according to following prompt:
Please match: VCI_888888888888(Bluetooth name)
Connected: VCI_888888888888(Bluetooth name)
Not connected: VCI_888888888888(Bluetooth Name).Please connect VIC connector to vehicle, X300 DP will connect automatically.
2. OBD2Tuner.com OBDSTAR X300 DP Mileage Correction WIFI Setting
Enter main menu screen, choose Settings > WLAN
When the WLAN sign appears blue, , it indicates Wi‐Fi has been activated already.
Note: To prolong the battery life, please switch Wi‐Fi off when it keeps unattended.Connect to WLAN
Start WLAN, if X300 DP within range of WLAN, X300 DP can automatically detect and connect to current WLAN, select desired network and input password, then you can surf the internet by WLAN.
3. OBDSTAR X300 DP Full Configuration VCI connector connection from obd2tuner.com:
Locate vehicle’s DLC socket. The DLC (Data Link Connector or Diagnostic Link Connector) is the standardized 16‐cavity connector where diagnostic code readers interface with the vehicle’s on‐board computer. The DLC is usually located 12 inches from the center of the instrument panel (dash), under or around the driver’s side for most vehicles. If Data Link Connector is not located under dashboard, a label should be there telling location. For some Asian and European vehicles, the DLC is located behind the ashtray and the ashtray must be removed to access the connector. If the DLC cannot be found, refer to the vehicle’s service manual for the location.
Plug the VCI diagnostic connector into the vehicle’s DLC socket (It is suggested to use the OBD 2 extension cable to connect VCI connector and DLC socket.). For non‐16PIN DLC socket, please select the corresponding non‐16 pin connector adapter, then plug the non‐16pin end
of the adapter into the DLC socket, and then connect the standard 16pin end VCI connector.
For More details information, welcome to Add my Whatsapp (+86 15889512468) or Skype obd2tuner.com) if you have, Your Private Secretary in Car Repair Area! 16 Hours Online at your Service!
www.OBD2Tuner.com- China OBD2 Tuner Tool Automotive Diagnostic Tools Car Key Programmer OBD2 ECU chip tuning tool Center.
Contacts:
Website: www.obd2tuner.com
Skype: OBD2Tuner.com
Email: info@obd2tuner.com
What;s app: +86 15889512468


评论
发表评论